Raspberry PiにUSBカメラを接続して、motionで 動体検知対応のカメラとして機能させるまでの備忘録
最初はインストール編
※一部の画像やシェルスクリプトは以前のものを使っています。ご了承ください。
環境は
USBカメラとの相性で、OS「Raspbian」はちょっと古いですがStretch版を利用
macOS Monterey 12.1
すべてマックのターミナル.appを使っての操作です。
ヘッドレス(モニタレス)で運用するので
2022.1現在、Download Raspbian for Raspberry Piのページからだと、最新版のOSのダウンロードになってしまうので、古いバージョンはIndex of /raspbian_lite/imagesからダウンロードします。
stretch版の最終版のファイル名は「2019-04-08-raspbian-stretch-lite.zip」というのでした。
わかりやすくするためにデスクトップに移動させてください。
ターミナルを起動したら(入力するのは「」の中)
「cd ~/Desktop/」と入力してリターンキー
でダウンロードしたファイルの場所へ移動(ここではデスクトップ)
unzip ファイル名で解凍(imgファイルが出来上がります)
「unzip 2019-04-08-raspbian-stretch-lite.zip 」と入力してリターンキー
$ unzip 2019-04-08-raspbian-stretch-lite.zip
Archive:  2019-04-08-raspbian-stretch-lite.zip
  inflating: 2019-04-08-raspbian-stretch-lite.img
microSDカード(利用したのは16GBのもの)をカードリーダにセットしたら、MacのUSBにカードリーダを挿す
マウント先の確認(Mac miniにSSDとHDDを入れて使用しています。)
ターミナルで「diskutil list」と入力したらリターンキー
$diskutil list
/dev/disk0 (internal):
#: TYPE NAME SIZE IDENTIFIER
0: GUID_partition_scheme 1.0 TB disk0
1: Apple_APFS_ISC 524.3 MB disk0s1
2: Apple_APFS Container disk3 994.7 GB disk0s2
3: Apple_APFS_Recovery 5.4 GB disk0s3
/dev/disk3 (synthesized):
#: TYPE NAME SIZE IDENTIFIER
0: APFS Container Scheme - +994.7 GB disk3
Physical Store disk0s2
1: APFS Volume Macintosh HD - Data 280.0 GB disk3s1
2: APFS Volume Macintosh HD 15.8 GB disk3s3
3: APFS Snapshot com.apple.os.update-... 15.8 GB disk3s3s1
4: APFS Volume Preboot 337.5 MB disk3s4
5: APFS Volume Recovery 831.9 MB disk3s5
6: APFS Volume VM 20.5 KB disk3s6
/dev/disk4 (external, physical):
#: TYPE NAME SIZE IDENTIFIER
0: FDisk_partition_scheme *16.1 GB disk4
1: Windows_FAT_32 boot 66.1 MB disk4s1
2: Linux 16.0 GB disk4s2
上記の例では、/dev/disk4 が microSD(16GB)になります。お使いの環境によって違ってきますので間違わないように
この後の例では /dev/disk4 で進めていきます。
microSDカードをFAT32でフォーマット
ターミナルで「diskutil eraseDisk FAT32 RPI /dev/disk4」と入力したらリターンキー
$ diskutil eraseDisk FAT32 RPI /dev/disk4
Started erase on disk4
Unmounting disk
Creating the partition map
Waiting for partitions to activate
Formatting disk3s2 as MS-DOS (FAT32) with name RPI
512 bytes per physical sector
/dev/rdisk3s2: 30978480 sectors in 1936155 FAT32 clusters (8192 bytes/cluster)
bps=512 spc=16 res=32 nft=2 mid=0xf8 spt=32 hds=255 hid=411648 drv=0x80 bsec=31008768 bspf=15127 rdcl=2 infs=1 bkbs=6
Mounting disk
Finished erase on disk4
一旦、microSDカードをアンマウントします
ターミナルで「diskutil unmountDisk /dev/disk4」と入力したらリターンキー
$ diskutil unmountDisk /dev/disk4
Unmount of all volumes on disk4 was successful
データの書き込み
「sudo dd bs=1m if=解凍してできたimgファイル of=microSDのマウント先」
ターミナルで
「sudo dd bs=1m if=2019-04-08-raspbian-stretch-lite.img of=/dev/rdisk4」と入力したらリターンキー
(補足:本当はof=/dev/disk4なのですが、disk4の前にrを付けた方が書き込みが早くなるらしいので)
Password:となったら管理者パスワードを入力してリターンキー
$ sudo dd bs=1m if=2019-04-08-raspbian-stretch-lite.img of=/dev/rdisk4
Password:
1776+0 records in
1776+0 records out
1862270976 bytes transferred in 234.684568 secs (7935208 bytes/sec)
しばらく時間が掛かるので、終わるまでじっと我慢 :wink_wp:
デスクトップには boot という名前でマウントされていました。
ヘッドレス(モニタレス)でのインストールにはsshを有効にしておく必要があるので、
Finderでboot内に、テキストエディタ等を使って「ssh」という名前で空のファイル(注意:拡張子はなし)を作成します。
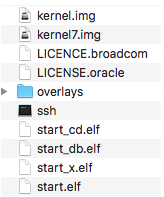
ターミナルで「diskutil unmountDisk /dev/disk4」と入力したらリターンキー
アンマウントしたら、カードリーダからmicroSDカードを取り出してRaspberry Piにセット
場所がちょっと分かりづらいですが、端子がある方を上に向けて差し込みます。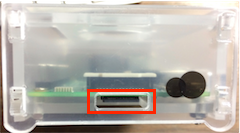
裏から見ると(microSDカードの文字がある側が見えているのが分かります)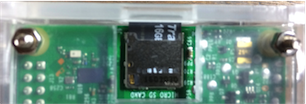
最初は有線で行うので、LANケーブル(片方はルータに)をRaspberry Piに接続して準備完了
問題ないことを確認したら、USB充電アダプタを電源コンセントに差し込むと起動します。
起動するまで少し時間がかかります。
しばらくしたら、LanScanなどのアプリでIPアドレスを調べます。
Macアドレスはたぶんb8:27:ebで始まるものになります。
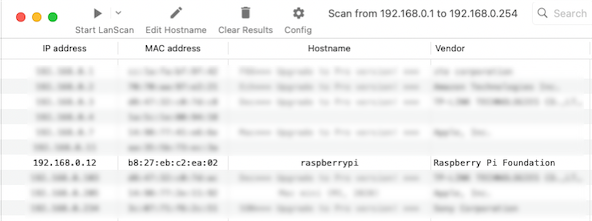
ここでは、192.168.0.12が該当するので、
ターミナルを起動して「ssh pi@192.168.0.12」と入力してリターンキー
もし、過去にRaspberry Piのインストールをしていて、公開鍵認証を設定している場合で以下のようなエラーが出た時は
Desktop % ssh pi@192.168.0.12
@@@@@@@@@@@@@@@@@@@@@@@@@@@@@@@@@@@@@@@@@@@@@@@@@@@@@@@@@@@
@    WARNING: REMOTE HOST IDENTIFICATION HAS CHANGED!     @
@@@@@@@@@@@@@@@@@@@@@@@@@@@@@@@@@@@@@@@@@@@@@@@@@@@@@@@@@@@
IT IS POSSIBLE THAT SOMEONE IS DOING SOMETHING NASTY!
Someone could be eavesdropping on you right now (man-in-the-middle attack)!
It is also possible that a host key has just been changed.
The fingerprint for the ED25519 key sent by the remote host is
SHA256:****************************************************.
Please contact your system administrator.
Add correct host key in /Users/**********/.ssh/known_hosts to get rid of this message.
Offending ECDSA key in /Users/**********/.ssh/known_hosts:4
Host key for 192.168.0.12 has changed and you have requested strict checking.
Host key verification failed.「ssh-keygen -R 192.168.0.12」と入力してリターンキー
 Desktop % ssh-keygen -R 192.168.0.12
# Host 192.168.0.12 found: line 2
# Host 192.168.0.12 found: line 3
# Host 192.168.0.12 found: line 4
/Users/**********/.ssh/known_hosts updated.
Original contents retained as /Users/**********/.ssh/known_hosts.old再度、ターミナルを起動して「ssh pi@192.168.0.12」と入力してリターンキ
password:と表示されたら
「raspberry」と入力してリターンキー
pi@raspberrypi:~ $
となればログイン完了です。
各種設定を行います。
Raspberry Piにログインした状態で
「sudo raspi-config」と入力してリターンキー
pi@raspberrypi:~ $ sudo raspi-config
言語の設定
上下矢印キーで「Localisation Options」を選択したら、左右矢印キーで「Select」を選択してリターンキー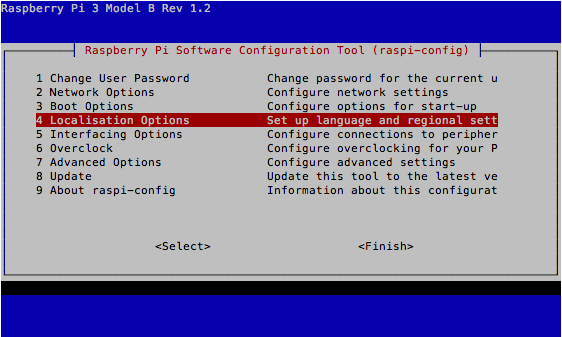
上下矢印キーで「Change Locale」を選択したら、左右矢印キーで「Select」を選択してリターンキー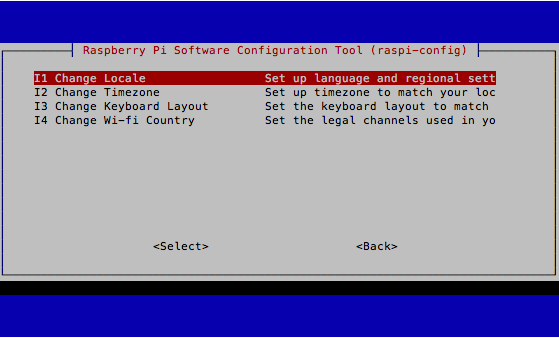
上下矢印キーで「ja_JP.UTF-8 UTF-8」を選択したら、
スペースキー(私の環境では、shiftキー+スペースキーじゃないとダメでした)を押してチェックを入れる
左右矢印キーで「Ok」を選択してリターンキー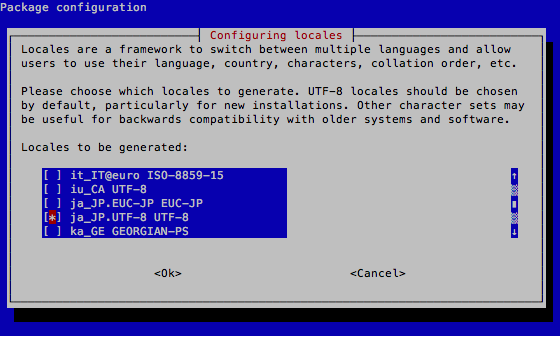
上下矢印キーで「ja_JP.UTF-8」を選択したら、
左右矢印キーで「Ok」を選択してリターンキー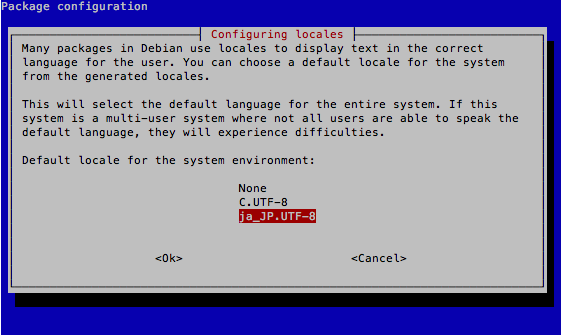
タイムゾーンの設定
上下矢印キーで「Localisation Timezone」を選択したら、左右矢印キーで「Select」を選択してリターンキー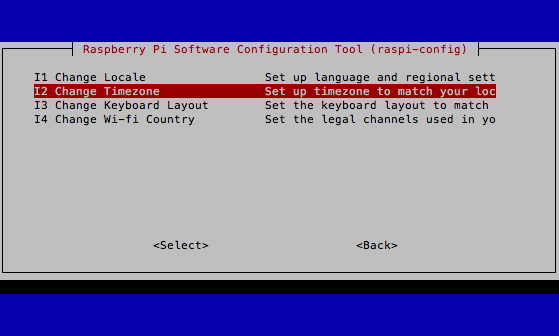
上下矢印キーで「Asia」を選択したら、左右矢印キーで「Ok」を選択してリターンキー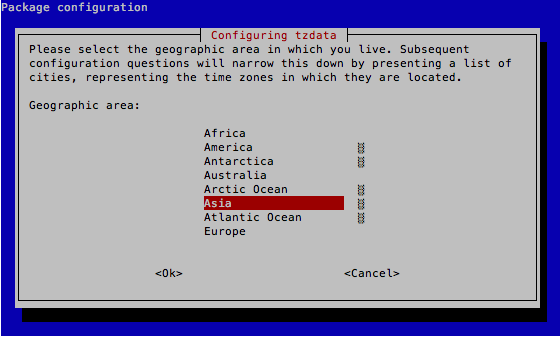
上下矢印キーで「Tokyo」を選択したら、左右矢印キーで「Ok」を選択してリターンキー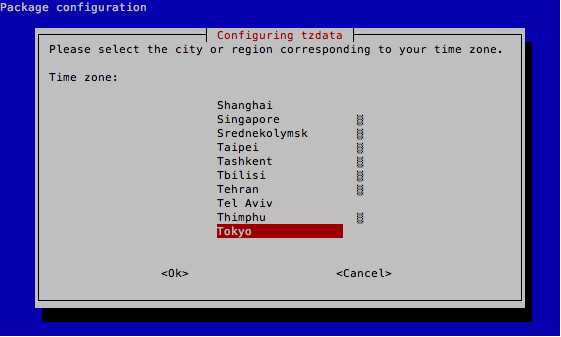
Wi-Fiの利用を日本に設定
上下矢印キーで「Change Wi-fi Country」を選択したら、左右矢印キーで「Select」を選択してリターンキー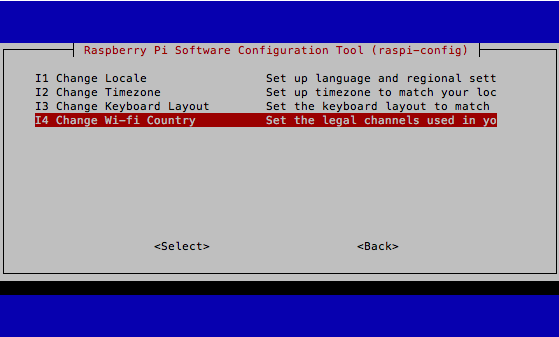
上下矢印キーで「Japan」を選択したら、左右矢印キーで「Ok」を選択してリターンキー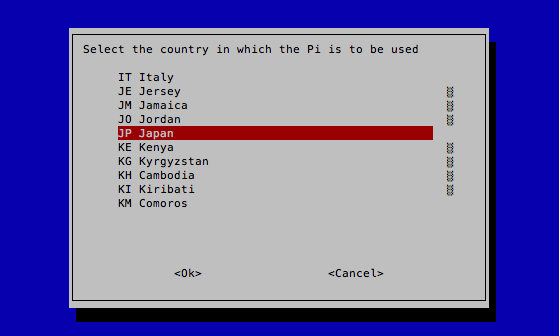
「Ok」が選択されているのを確認して、リターンキー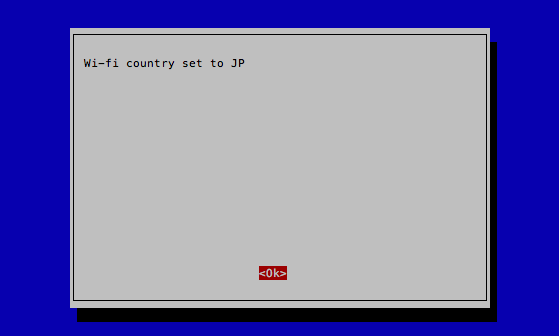
microSDカードの容量を認識させる
上下矢印キーで「Advanced Options」を選択したら、左右矢印キーで「Select」を選択してリターンキー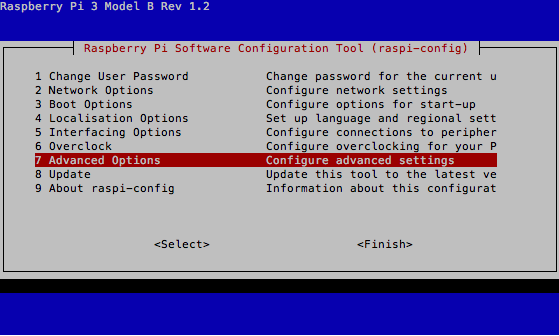
上下矢印キーで「 Expand Filesystem」を選択したら、左右矢印キーで「Select」を選択してリターンキー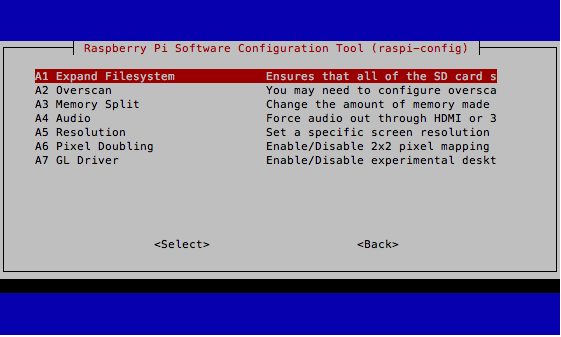
「Ok」が選択されているのを確認して、リターンキー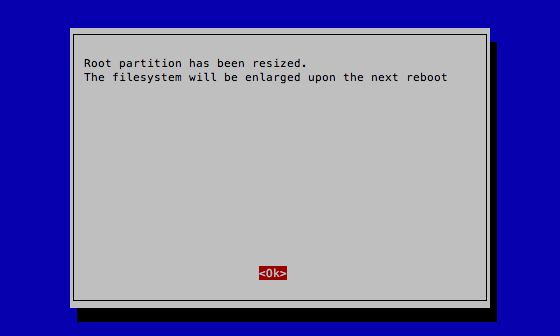
(再起動後に有効になります)
SSHを有効にする
上下矢印キーで「Interfacing Options」を選択したら、左右矢印キーで「Select」を選択してリターンキー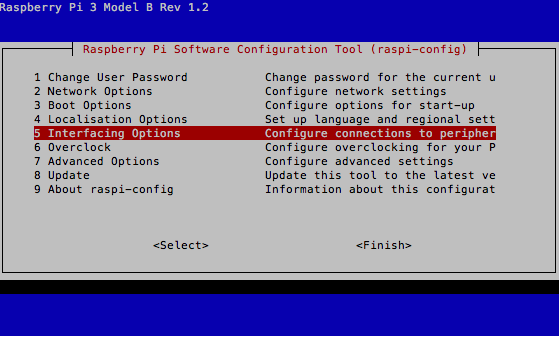
上下矢印キーで「SSH」を選択したら、左右矢印キーで「Select」を選択してリターンキー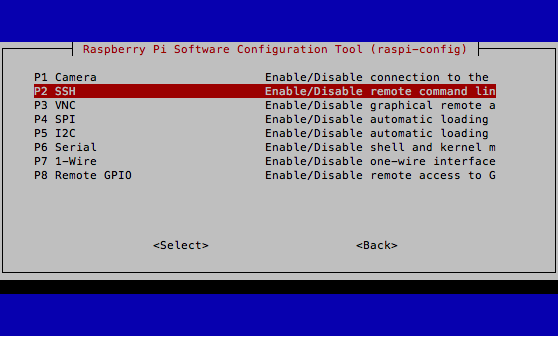
Would you like the SSH server to be enabled?と聞かれたら
左右矢印キーで「Yes」を選択してリターンキー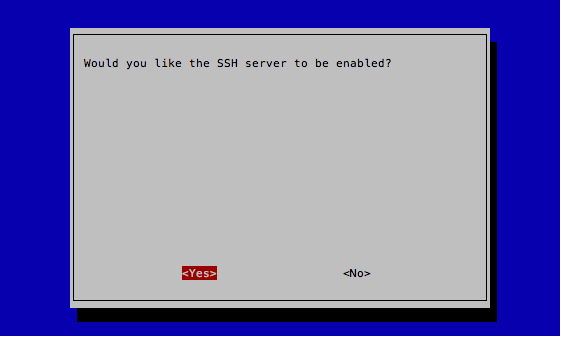
The SSH server is enabledと表示されたら、
「Ok」が選択されているのを確認してリターンキー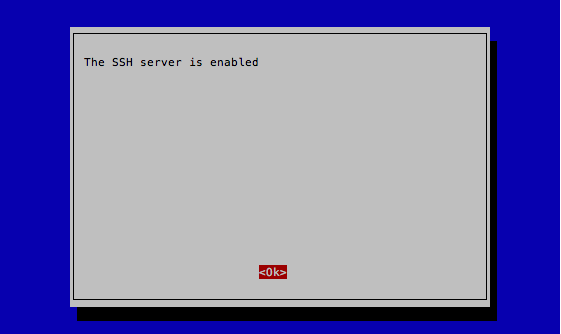
MacからSSHで接続してみます。(この段階ではまだ有線です)
Raspberry Piにログインした状態で
一旦「exit」と入力してリターンキーで抜けます。
pi@raspberrypi:~ $ exit
LanScan (無料)等、IPアドレスを検索できるソフトを使って、Raspberry Piを検索します。
例ではRaspberry PiのIPアドレスは192.168.0.12になっていました。
以下の192.168.0.12の箇所は、お使いのRaspberry PiのIPアドレスに置き換えてください。
「ssh pi@192.168.0.12」と入力してリターンキー
もし、過去にRaspberry Piのインストールをしていて、公開鍵認証を設定している場合で以下のようなエラーが出た時は
Desktop % ssh pi@192.168.0.12
@@@@@@@@@@@@@@@@@@@@@@@@@@@@@@@@@@@@@@@@@@@@@@@@@@@@@@@@@@@
@    WARNING: REMOTE HOST IDENTIFICATION HAS CHANGED!     @
@@@@@@@@@@@@@@@@@@@@@@@@@@@@@@@@@@@@@@@@@@@@@@@@@@@@@@@@@@@
IT IS POSSIBLE THAT SOMEONE IS DOING SOMETHING NASTY!
Someone could be eavesdropping on you right now (man-in-the-middle attack)!
It is also possible that a host key has just been changed.
The fingerprint for the ED25519 key sent by the remote host is
SHA256:****************************************************.
Please contact your system administrator.
Add correct host key in /Users/**********/.ssh/known_hosts to get rid of this message.
Offending ECDSA key in /Users/**********/.ssh/known_hosts:4
Host key for 192.168.0.12 has changed and you have requested strict checking.
Host key verification failed.「ssh-keygen -R 192.168.0.12」と入力してリターンキー
ssh-keygen -R 192.168.0.12
# Host 192.168.0.12 found: line 2
/*********/.ssh/known_hosts updated.
Original contents retained as /*********/.ssh/known_hosts.old
もう一度
「ssh pi@192.168.0.12」と入力してリターンキー
途中で、
Are you sure you want to continue connecting (yes/no)?
と聞かれたら、
「yes」と入力してリターンキー
pi@192.168.0.12’s password:
と聞かれたら、初期パスワードの
「raspberry」と入力してリターンキー
pi@raspberrypi:~ $
となればSSHでの接続完了です。
パスワードの変更
Raspberry Piにログインした状態で
「sudo raspi-config」と入力してリターンキー
設定画面を開きます。
pi@raspberrypi:~ $ sudo raspi-config
上下矢印キーで「Change User Password」を選択したら、左右矢印キーで「Select」を選択してリターンキー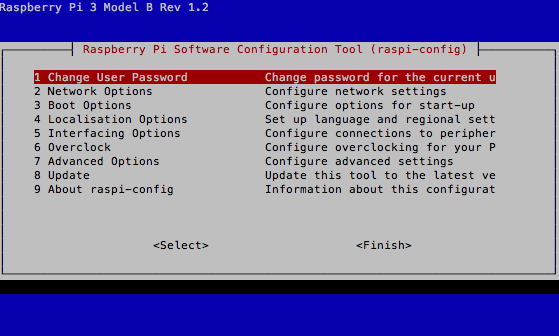
You will now be asked to enter new password for the pi user
「Ok」または「了解」が選択されているのを確認してリターンキー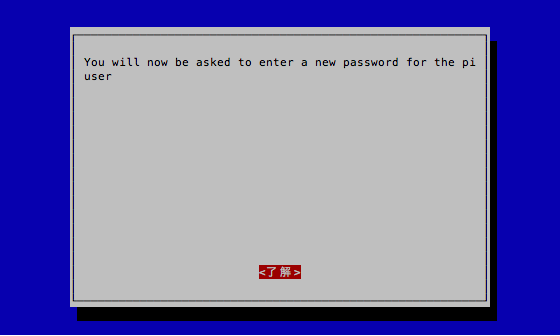
Enter new UNIX password:(新しい UNIX パスワードを入力してください:)となったら
新しいパスワードを入力してリターンキー
Retype new UNIX password:(新しい UNIX パスワードを再入力してください:)となったら
同じものをもう一度入力してリターンキー
Password changed successfullyなったら「Ok」または「了解」が選択されているのを確認してリターンキー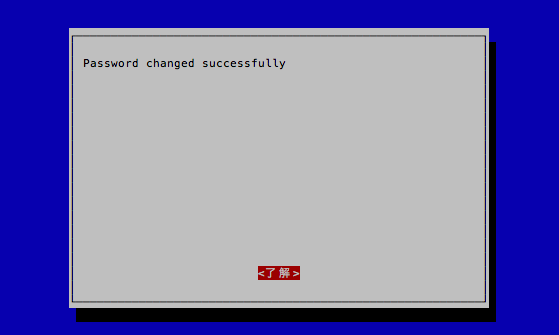
設定画面を終了するには
左右矢印キーで「Finish」を選択してリターンキー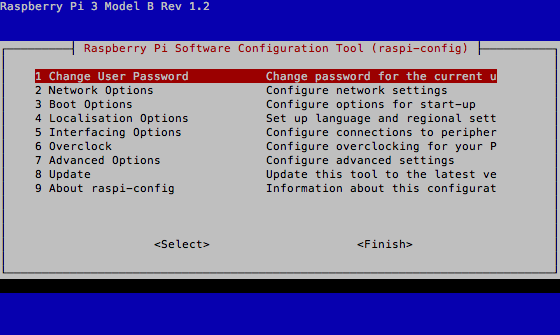
新しいパスワードで接続してみる
Raspberry Piにログインした状態で
一旦「exit」と入力してリターンキーで抜けます。
pi@raspberrypi:~ $ exit
「ssh pi@192.168.0.12」と入力してリターンキー
pi@192.168.0.12’s password:
と表示されたら、新しいパスワードを入力してリターンキー
The programs included with the Debian GNU/Linux system are free software;
the exact distribution terms for each program are described in the
individual files in /usr/share/doc/*/copyright.
Debian GNU/Linux comes with ABSOLUTELY NO WARRANTY, to the extent
permitted by applicable law.
Last login: 前回のログイン日時
pi@raspberrypi:~ $
となればログイン完了です。
無線LANで接続するための設定
Raspberry Pi 3を買ってMacを使ってWiFi接続とSSHの接続するまで – Qiitaのページのままです。
それだけじゃなんなので簡単な説明を
Raspberry Piにログインした状態で
ターミナルで「ip addr」と入力してリターンキー
wlan0がWi-Fiのものになります。
pi@raspberrypi:~ $ ip addr
1: lo: <loopback,up,lower_up> mtu 65536 qdisc noqueue state UNKNOWN group default qlen 1000
   省略
2: eth0: <broadcast,multicast,up,lower_up> mtu 1500 qdisc pfifo_fast state UP group default qlen 1000
    省略
3: wlan0: <no-carrier,broadcast,multicast,up> mtu 1500 qdisc pfifo_fast state DOWN group default qlen 1000
    link/ether xx:xx:xx:xx:xx:xx brd ff:ff:ff:ff:ff:ff</no-carrier,broadcast,multicast,up></broadcast,multicast,up,lower_up></loopback,up,lower_up>
形式は
sudo sh -c ‘wpa_passphrase ルータのSSID そのSSIDの暗号化キー >> /etc/wpa_supplicant/wpa_supplicant.conf’
例えば
ルータのSSIDが「hogehoge-aterm」
暗号化キーが「1234ABCD」
だとすると
「sudo sh -c ‘wpa_passphrase hogehoge-aterm 1234ABCD >> /etc/wpa_supplicant/wpa_supplicant.conf’」と入力してリターンキー
※注意点
Raspberry Pi 3 Model BのWi-Fiは2.4GHzのみの対応となるので、お使いのルータのSSIDは2.4GHzの方を指定してください。
さらにルータでMacアドレスのフィルタリングをしている場合は、Raspberry Piのものを追加しておくのを忘れずに
Macアドレスは、先ほどLanScanで検索した時に表示されていたものになります。wlan0のlink/etherの後に表示されているxx:xx:xx:xx:xx:xx も同じです。
設定した内容を編集
Raspberry Piにログインした状態で
「sudo nano /etc/wpa_supplicant/wpa_supplicant.conf」と入力してリターンキー
管理者パスワードを聞かれたら入力してリターンキー
ctrl_interface=DIR=/var/run/wpa_supplicant GROUP=netdev
update_config=1
country=GB
network={
        ssid="ルータのSSID"
        #psk="暗号化キーがそのまま表示されている"
        psk=080d23xxxxxxxxxxxxxxxxxxxxxxxxxxxxxxxxxxxxxxxxxxxxxxxxxxxxxxxxxx
}
暗号化キーがそのまま表示されているので
#psk=””の行を削除して
私の場合は、ルータの暗号化モードをWPA2-PSK(AES)にしているので
key_mgmt=WPA-PSK
proto=RSN
pairwise=CCMP
group=CCMP
を追加して以下のようにしました。
network={
        ssid="ルータのSSID"
        key_mgmt=WPA-PSK
        proto=RSN
        pairwise=CCMP
        group=CCMP
        psk=080d23xxxxxxxxxxxxxxxxxxxxxxxxxxxxxxxxxxxxxxxxxxxxxxxxxxxxxxxxxx
}
問題なければ、「controlキー + o」
File Name to Writeと下に表示されたらリターンキー
「controlキー + x」で編集を終了します。
IPアドレスの固定
毎回IPアドレスを調べるのは大変なので、IPアドレスを固定します。
Raspberry Piにログインした状態で
「sudo nano /etc/dhcpcd.conf」と入力してリターンキー
管理者パスワードを聞かれたら入力してリターンキー
例えば、192.168.0.123に固定したい場合は以下を追加
ルーターおよびDNSは例では192.168.0.1にしていますので、ご自分の環境に合わせて変更してください。
有線の場合
# Custom static eth0 IP address
interface eth0
static ip_address=192.168.0.123/24
static routers=192.168.0.1
static domain_name_servers=192.168.0.1
無線LANの場合
# Custom static IP address コメントは自分で分かりやすいように自由に記述してください
interface wlan0
static ip_address=192.168.0.123/24
static routers=192.168.0.1
static domain_name_servers=192.168.0.1
問題なければ、「controlキー + o」
File Name to Writeと下に表示されたらリターンキー
「controlキー + x」で編集を終了します。
さあいよいよ無線LANでの接続になります。
Raspberry Piを終了します。
ターミナルで「sudo shutdown -h now」と入力してリターンキー
管理者パスワードを聞かれたら入力してリターンキー
緑のランプが点滅してから消えて、赤のランプだけになったら、コンセントから抜いてください。
LANケーブルをRaspberry Piから抜きます。
残すのはUSBケーブル(片側はUSB充電アダプタ)のみ
USB充電アダプタをコンセントに挿してRaspberry Piを起動します。
Macでターミナルを起動したら、
「ssh pi@固定したIPアドレス」
例の場合は
「ssh pi@192.168.0.123」と入力してリターンキー
@@@@@@@@@@@@@@@@@@@@@@@@@@@@@@@@@@@@@@@@@@@@@@@@@@@@@@@@@@@
@ WARNING: REMOTE HOST IDENTIFICATION HAS CHANGED! @
@@@@@@@@@@@@@@@@@@@@@@@@@@@@@@@@@@@@@@@@@@@@@@@@@@@@@@@@@@@
IT IS POSSIBLE THAT SOMEONE IS DOING SOMETHING NASTY!
Someone could be eavesdropping on you right now (man-in-the-middle attack)!
It is also possible that a host key has just been changed.
The fingerprint for the ECDSA key sent by the remote host is
SHA256:xxxxxxxxxxxxxxxxxxxxxxxxxxxxxxxxxxxxxxx.
Please contact your system administrator.
Add correct host key in /hogehoge/.ssh/known_hosts to get rid of this message.
Offending ECDSA key in /hogehoge/.ssh/known_hosts:2
ECDSA host key for 192.168.0.123 has changed and you have requested strict checking.
Host key verification failed.
「ssh-keygen -R 192.168.0.123」と入力してリターンキー
ssh-keygen -R 192.168.0.123
# Host 192.168.0.123 found: line 2
/hogehoge/cotton/.ssh/known_hosts updated.
Original contents retained as /hogehoge/hogehoge/.ssh/known_hosts.old
もう一度
「ssh pi@192.168.0.123」と入力してリターンキー
途中で、
Are you sure you want to continue connecting (yes/no)?
と聞かれたら、
「yes」と入力してリターンキー
pi@192.168.0.123’s password:
と聞かれたら、変更したパスワードを入力してリターンキー
pi@raspberrypi:~ $
となればOKです。
次回は、毎回パスワードを入力するのは大変なので、公開鍵認証を使ったSSH接続の設定について記載します。
補足
Raspberry Piの終了について
「sudo shutdown -h now」と入力してリターンキー
緑色のランプが何度か点滅して、赤色のランプのみの点灯になれば、コンセントから抜いて大丈夫です。

コメント